# How to Install Windows 11 Without a Microsoft Account

By default, you must log in with a [Microsoft](https://www.tomshardware.com/tag/microsoft) account in order to install [Windows 11](https://www.tomshardware.com/tag/windows-11) or go through the box (OOBE) setup process that triggers the first time you turn on a new laptop or desktop. Though Microsoft accounts are free, there are many reasons why you would want to install Windows 11 using a local account only.

<div class="ad-unit" id="bkmrk-" style="text-align: justify;"></div>Maybe you want to use a local account because you are installing Windows 11 on a child's PC or on a PC that you plan to sell, give to a friend or donate to a charity (without giving other people access to personal data). Or perhaps you just like your privacy and don't want to create an account with Microsoft in the first place.

Whatever your reason for doing so, it's easy to install or set up Windows 11 with a without using a Microsoft account. Below, we'll show you two methods: the first involves issuing some commands during the install / OOBE processor. The second, which only works for a clean install, requires you to create a modified USB install disk using a free tool called Rufus.

There's a simple trick for setting up a local account that involves issuing a command to keep Windows from requiring Internet to install / set up and then cutting off Internet at just the right time in the setup process. This works the same way whether you are doing a clean install of Windows 11 or following the OOBE process on a store-bought computer.

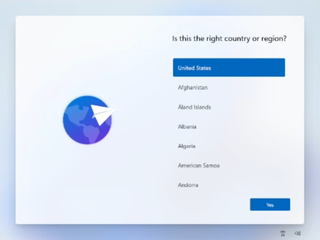
1\. **Follow the Windows 11 install process until you get to the "choose a country" screen.**
<div class="ad-unit" id="bkmrk--0"></div><figure class="van-image-figure inline-layout" data-bordeaux-image-check="" id="bkmrk--1"><picture><source sizes="(min-width: 1000px) 970px, calc(100vw - 40px)" srcset="https://cdn.mos.cms.futurecdn.net/8Vo9LSFJHPgVJ4Anr7rYz-320-80.png.webp 320w, https://cdn.mos.cms.futurecdn.net/8Vo9LSFJHPgVJ4Anr7rYz-480-80.png.webp 480w, https://cdn.mos.cms.futurecdn.net/8Vo9LSFJHPgVJ4Anr7rYz-650-80.png.webp 650w, https://cdn.mos.cms.futurecdn.net/8Vo9LSFJHPgVJ4Anr7rYz-970-80.png.webp 970w, https://cdn.mos.cms.futurecdn.net/8Vo9LSFJHPgVJ4Anr7rYz-1024-80.png.webp 1024w, https://cdn.mos.cms.futurecdn.net/8Vo9LSFJHPgVJ4Anr7rYz-1200-80.png.webp 1200w" type="image/webp"></source></picture>

<div class="image-full-width-wrapper"><div class="image-full-width-wrapper"><div class="image-widthsetter"><figure class="expandable-image">![choose a country](https://cdn.mos.cms.futurecdn.net/8Vo9LSFJHPgVJ4Anr7rYz-320-80.png)<div class="expand icon icon-expand-image">  
</div></figure></div></div></div><figcaption class=" inline-layout"></figcaption></figure>Now's the time to cut off the Internet. However, before you do, you need to issue a command that prevents Windows 11 from forcing you to have an Internet connection.

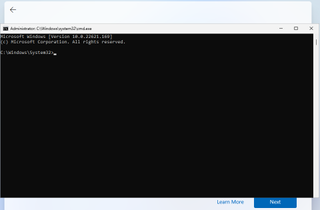
2\. **Hit Shift + F10**. A command prompt appears.
<figure class="van-image-figure inline-layout" data-bordeaux-image-check="" id="bkmrk--2"><picture>![Launch command prompt](https://cdn.mos.cms.futurecdn.net/zq86jbGo6LMjFzBXhSbpuk-320-80.png)</picture>

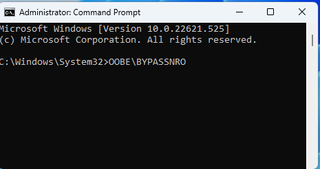
<figcaption class=" inline-layout"></figcaption></figure>3\. **Type** ***OOBE\\BYPASSNRO** to disable the Internet connection requirement.
<figure class="van-image-figure inline-layout" data-bordeaux-image-check="" id="bkmrk--3"><picture><source sizes="(min-width: 1000px) 970px, calc(100vw - 40px)" srcset="https://cdn.mos.cms.futurecdn.net/e8WeNTRYHWLKgr8Voytsti-320-80.png.webp 320w, https://cdn.mos.cms.futurecdn.net/e8WeNTRYHWLKgr8Voytsti-480-80.png.webp 480w, https://cdn.mos.cms.futurecdn.net/e8WeNTRYHWLKgr8Voytsti-650-80.png.webp 650w, https://cdn.mos.cms.futurecdn.net/e8WeNTRYHWLKgr8Voytsti-970-80.png.webp 970w, https://cdn.mos.cms.futurecdn.net/e8WeNTRYHWLKgr8Voytsti-1024-80.png.webp 1024w, https://cdn.mos.cms.futurecdn.net/e8WeNTRYHWLKgr8Voytsti-1200-80.png.webp 1200w" type="image/webp">![oobe bypassnro](https://cdn.mos.cms.futurecdn.net/e8WeNTRYHWLKgr8Voytsti-320-80.png)</source></picture>

<figcaption class=" inline-layout"></figcaption></figure>The computer will reboot and return you to this screen.

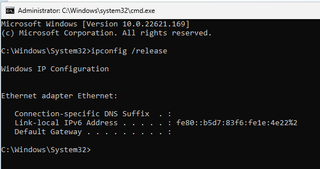
4\. **Hit Shift + F10 again** and this time **Type** ***ipconfig /release.*** Then **hit Enter** to disable the Internet.
<figure class="van-image-figure inline-layout" data-bordeaux-image-check="" id="bkmrk--4"><picture><source sizes="(min-width: 1000px) 970px, calc(100vw - 40px)" srcset="https://cdn.mos.cms.futurecdn.net/Q3BRpSgzJi8T6MxrtnUcvb-320-80.png.webp 320w, https://cdn.mos.cms.futurecdn.net/Q3BRpSgzJi8T6MxrtnUcvb-480-80.png.webp 480w, https://cdn.mos.cms.futurecdn.net/Q3BRpSgzJi8T6MxrtnUcvb-650-80.png.webp 650w, https://cdn.mos.cms.futurecdn.net/Q3BRpSgzJi8T6MxrtnUcvb-970-80.png.webp 970w, https://cdn.mos.cms.futurecdn.net/Q3BRpSgzJi8T6MxrtnUcvb-1024-80.png.webp 1024w, https://cdn.mos.cms.futurecdn.net/Q3BRpSgzJi8T6MxrtnUcvb-1200-80.png.webp 1200w" type="image/webp">![ipconfig release](https://cdn.mos.cms.futurecdn.net/Q3BRpSgzJi8T6MxrtnUcvb-320-80.png)</source></picture>

<figcaption class=" inline-layout"></figcaption></figure>5\. **Close the command prompt**.

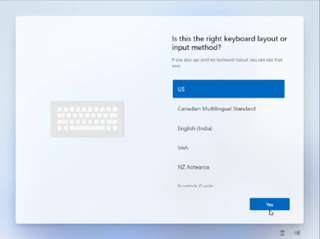
6\. **Continue with the installation,** choosing the region. keyboard and second keyboard option.
<figure class="van-image-figure inline-layout" data-bordeaux-image-check="" id="bkmrk--5"><picture><source sizes="(min-width: 1000px) 970px, calc(100vw - 40px)" srcset="https://cdn.mos.cms.futurecdn.net/wZDtNR3r6b6J679xeosyYX-320-80.png.webp 320w, https://cdn.mos.cms.futurecdn.net/wZDtNR3r6b6J679xeosyYX-480-80.png.webp 480w, https://cdn.mos.cms.futurecdn.net/wZDtNR3r6b6J679xeosyYX-650-80.png.webp 650w, https://cdn.mos.cms.futurecdn.net/wZDtNR3r6b6J679xeosyYX-970-80.png.webp 970w, https://cdn.mos.cms.futurecdn.net/wZDtNR3r6b6J679xeosyYX-1024-80.png.webp 1024w, https://cdn.mos.cms.futurecdn.net/wZDtNR3r6b6J679xeosyYX-1200-80.png.webp 1200w" type="image/webp">![win 11 install keyboard chioce](https://cdn.mos.cms.futurecdn.net/wZDtNR3r6b6J679xeosyYX-320-80.png)</source></picture>

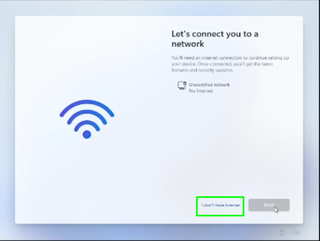
<figcaption class=" inline-layout"></figcaption></figure>A screen saying "Let's connect you to a network" appears, warning you that you need Internet.

7\. **Click "I don't have Internet"** to continue.
<figure class="van-image-figure inline-layout" data-bordeaux-image-check="" id="bkmrk--6"><picture><source sizes="(min-width: 1000px) 970px, calc(100vw - 40px)" srcset="https://cdn.mos.cms.futurecdn.net/rdtG62iHg2T6va3wcRBYLf-320-80.png.webp 320w, https://cdn.mos.cms.futurecdn.net/rdtG62iHg2T6va3wcRBYLf-480-80.png.webp 480w, https://cdn.mos.cms.futurecdn.net/rdtG62iHg2T6va3wcRBYLf-650-80.png.webp 650w, https://cdn.mos.cms.futurecdn.net/rdtG62iHg2T6va3wcRBYLf-970-80.png.webp 970w, https://cdn.mos.cms.futurecdn.net/rdtG62iHg2T6va3wcRBYLf-1024-80.png.webp 1024w, https://cdn.mos.cms.futurecdn.net/rdtG62iHg2T6va3wcRBYLf-1200-80.png.webp 1200w" type="image/webp">![click I don't have Internet](https://cdn.mos.cms.futurecdn.net/rdtG62iHg2T6va3wcRBYLf-320-80.png)</source></picture>

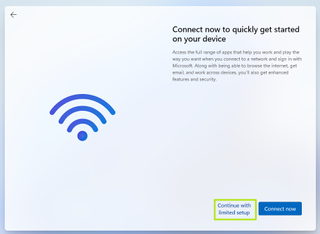
<figcaption class=" inline-layout"></figcaption></figure>8\. **Click Continue with limited setup**.
<figure class="van-image-figure inline-layout" data-bordeaux-image-check="" id="bkmrk--7"><picture><source sizes="(min-width: 1000px) 970px, calc(100vw - 40px)" srcset="https://cdn.mos.cms.futurecdn.net/TzfbabcfFrwqpsKU2mDonH-320-80.png.webp 320w, https://cdn.mos.cms.futurecdn.net/TzfbabcfFrwqpsKU2mDonH-480-80.png.webp 480w, https://cdn.mos.cms.futurecdn.net/TzfbabcfFrwqpsKU2mDonH-650-80.png.webp 650w, https://cdn.mos.cms.futurecdn.net/TzfbabcfFrwqpsKU2mDonH-970-80.png.webp 970w, https://cdn.mos.cms.futurecdn.net/TzfbabcfFrwqpsKU2mDonH-1024-80.png.webp 1024w, https://cdn.mos.cms.futurecdn.net/TzfbabcfFrwqpsKU2mDonH-1200-80.png.webp 1200w" type="image/webp"></source></picture>

<div class="image-full-width-wrapper"><div class="image-full-width-wrapper"><div class="image-widthsetter"><figure class="expandable-image">![Click Continue with Limited Setup](https://cdn.mos.cms.futurecdn.net/TzfbabcfFrwqpsKU2mDonH-320-80.png)<div class="expand icon icon-expand-image">  
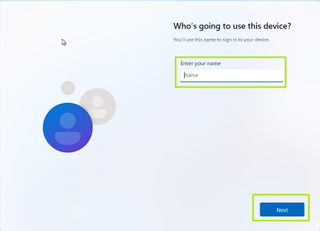
</div></figure></div></div></div><figcaption class=" inline-layout"></figcaption></figure>A new login screen appears asking "Who's going to use this device?"

9\. **Enter a username** you want to use for your local account and **click Next**.
<figure class="van-image-figure inline-layout" data-bordeaux-image-check="" id="bkmrk--8"><picture><source sizes="(min-width: 1000px) 970px, calc(100vw - 40px)" srcset="https://cdn.mos.cms.futurecdn.net/aMtguejy8dFV3VSJgeUsgE-320-80.png.webp 320w, https://cdn.mos.cms.futurecdn.net/aMtguejy8dFV3VSJgeUsgE-480-80.png.webp 480w, https://cdn.mos.cms.futurecdn.net/aMtguejy8dFV3VSJgeUsgE-650-80.png.webp 650w, https://cdn.mos.cms.futurecdn.net/aMtguejy8dFV3VSJgeUsgE-970-80.png.webp 970w, https://cdn.mos.cms.futurecdn.net/aMtguejy8dFV3VSJgeUsgE-1024-80.png.webp 1024w, https://cdn.mos.cms.futurecdn.net/aMtguejy8dFV3VSJgeUsgE-1200-80.png.webp 1200w" type="image/webp"></source></picture>

<div class="image-full-width-wrapper"><div class="image-full-width-wrapper"><div class="image-widthsetter"><figure class="expandable-image">![Enter your name and click Next](https://cdn.mos.cms.futurecdn.net/aMtguejy8dFV3VSJgeUsgE-320-80.png)<div class="expand icon icon-expand-image">  
</div></figure></div></div></div><figcaption class=" inline-layout"></figcaption></figure>10\. **Enter a password** you would like to use and **click Next**. You can also leave this field blank and have no password, but that's not recommended.
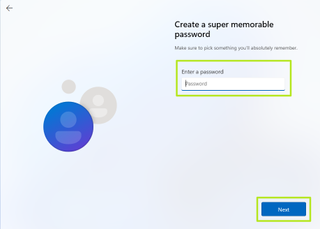
<figure class="van-image-figure inline-layout" data-bordeaux-image-check="" id="bkmrk--9"><picture><source sizes="(min-width: 1000px) 970px, calc(100vw - 40px)" srcset="https://cdn.mos.cms.futurecdn.net/wCwjVh4E4xCupQciAzbKzW-320-80.png.webp 320w, https://cdn.mos.cms.futurecdn.net/wCwjVh4E4xCupQciAzbKzW-480-80.png.webp 480w, https://cdn.mos.cms.futurecdn.net/wCwjVh4E4xCupQciAzbKzW-650-80.png.webp 650w, https://cdn.mos.cms.futurecdn.net/wCwjVh4E4xCupQciAzbKzW-970-80.png.webp 970w, https://cdn.mos.cms.futurecdn.net/wCwjVh4E4xCupQciAzbKzW-1024-80.png.webp 1024w, https://cdn.mos.cms.futurecdn.net/wCwjVh4E4xCupQciAzbKzW-1200-80.png.webp 1200w" type="image/webp">![Enter password](https://cdn.mos.cms.futurecdn.net/wCwjVh4E4xCupQciAzbKzW-320-80.png)</source></picture>

<figcaption class=" inline-layout"></figcaption></figure>11\. **Complete the rest of the install process** as you normally would.

## How to Create a Windows 11 Install Disk that Allows Bypassing Microsoft Accounts 

You can also create an install disk that has the "no Internet required" setting built into the setup process.
<figure class="van-image-figure inline-layout" data-bordeaux-image-check="" id="bkmrk--10"><picture><source sizes="(min-width: 1000px) 970px, calc(100vw - 40px)" srcset="https://cdn.mos.cms.futurecdn.net/4mKouULaijeQuC6Urh7J3T-320-80.png.webp 320w, https://cdn.mos.cms.futurecdn.net/4mKouULaijeQuC6Urh7J3T-480-80.png.webp 480w, https://cdn.mos.cms.futurecdn.net/4mKouULaijeQuC6Urh7J3T-650-80.png.webp 650w, https://cdn.mos.cms.futurecdn.net/4mKouULaijeQuC6Urh7J3T-970-80.png.webp 970w, https://cdn.mos.cms.futurecdn.net/4mKouULaijeQuC6Urh7J3T-1024-80.png.webp 1024w, https://cdn.mos.cms.futurecdn.net/4mKouULaijeQuC6Urh7J3T-1200-80.png.webp 1200w" type="image/webp">![Oops you've lost your internet connection](https://cdn.mos.cms.futurecdn.net/4mKouULaijeQuC6Urh7J3T-320-80.png)</source></picture>

<figcaption class=" inline-layout"></figcaption></figure>Here's how to make a Windows 11 install disk that will let you disconnect from the Internet during setup so you can create a local account instead of using a Microsoft one.

1\. **Download the Windows 11 ISO file** for Windows 11 [from Microsoft](https://click.linksynergy.com/deeplink?id=kXQk6%2AivFEQ&mid=24542&u1=tomshardware-row-7158412726347833047&murl=https%3A%2F%2Fwww.microsoft.com%2Fsoftware-download%2Fwindows11). For more detail, see our [how to download a Windows 11 ISO](https://www.tomshardware.com/how-to/clean-install-windows-11) file article.

2\. **Insert a USB Flash drive** you want to use as an install disk if one is not already inserted. Note that this drive will be completely erased during the process and it must be at least 8GB. If you are just installing Windows in a virtual machine, you can create an ISO file instead of writing directly to a Flash drive, but we'll assume you're not doing that here.

3\. **Download and launch** [**Rufus**](https://rufus.ie/) version 4.4 or higher. There is no installation process, but you may be asked to confirm permissions by Windows User Account control.

4\. **Select the USB drive** from the menu in Rufus if it's not already selected.
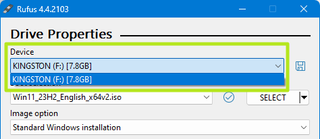
<figure class="van-image-figure inline-layout" data-bordeaux-image-check="" id="bkmrk--11"><picture><source sizes="(min-width: 1000px) 970px, calc(100vw - 40px)" srcset="https://cdn.mos.cms.futurecdn.net/hutXeFpqCSiD9MAxwWY52Q-320-80.png.webp 320w, https://cdn.mos.cms.futurecdn.net/hutXeFpqCSiD9MAxwWY52Q-480-80.png.webp 480w, https://cdn.mos.cms.futurecdn.net/hutXeFpqCSiD9MAxwWY52Q-650-80.png.webp 650w, https://cdn.mos.cms.futurecdn.net/hutXeFpqCSiD9MAxwWY52Q-970-80.png.webp 970w, https://cdn.mos.cms.futurecdn.net/hutXeFpqCSiD9MAxwWY52Q-1024-80.png.webp 1024w, https://cdn.mos.cms.futurecdn.net/hutXeFpqCSiD9MAxwWY52Q-1200-80.png.webp 1200w" type="image/webp"></source></picture>

<div class="image-full-width-wrapper"><div class="image-full-width-wrapper"><div class="image-widthsetter"><figure class="expandable-image">![Pick a USB Drive](https://cdn.mos.cms.futurecdn.net/hutXeFpqCSiD9MAxwWY52Q-320-80.png)<div class="expand icon icon-expand-image">  
</div></figure></div></div></div><figcaption class=" inline-layout"></figcaption></figure>5\. **Click Select** and **choose the ISO file**.
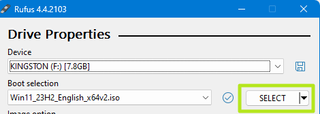
<figure class="van-image-figure inline-layout" data-bordeaux-image-check="" id="bkmrk--12"><picture><source sizes="(min-width: 1000px) 970px, calc(100vw - 40px)" srcset="https://cdn.mos.cms.futurecdn.net/kqtfjyKiJWWGuVo2qAYJvX-320-80.png.webp 320w, https://cdn.mos.cms.futurecdn.net/kqtfjyKiJWWGuVo2qAYJvX-480-80.png.webp 480w, https://cdn.mos.cms.futurecdn.net/kqtfjyKiJWWGuVo2qAYJvX-650-80.png.webp 650w, https://cdn.mos.cms.futurecdn.net/kqtfjyKiJWWGuVo2qAYJvX-970-80.png.webp 970w, https://cdn.mos.cms.futurecdn.net/kqtfjyKiJWWGuVo2qAYJvX-1024-80.png.webp 1024w, https://cdn.mos.cms.futurecdn.net/kqtfjyKiJWWGuVo2qAYJvX-1200-80.png.webp 1200w" type="image/webp">![Select an ISO](https://cdn.mos.cms.futurecdn.net/kqtfjyKiJWWGuVo2qAYJvX-320-80.png)</source></picture>

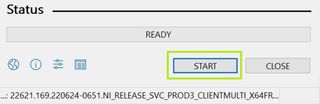
<figcaption class=" inline-layout"></figcaption></figure>6\. **Click Start** at the bottom of the Rufus window.
<figure class="van-image-figure inline-layout" data-bordeaux-image-check="" id="bkmrk--13"><picture><source sizes="(min-width: 1000px) 970px, calc(100vw - 40px)" srcset="https://cdn.mos.cms.futurecdn.net/wbZbRmVNUGVPQj2eejTGEZ-320-80.jpg.webp 320w, https://cdn.mos.cms.futurecdn.net/wbZbRmVNUGVPQj2eejTGEZ-480-80.jpg.webp 480w, https://cdn.mos.cms.futurecdn.net/wbZbRmVNUGVPQj2eejTGEZ-650-80.jpg.webp 650w, https://cdn.mos.cms.futurecdn.net/wbZbRmVNUGVPQj2eejTGEZ-970-80.jpg.webp 970w, https://cdn.mos.cms.futurecdn.net/wbZbRmVNUGVPQj2eejTGEZ-1024-80.jpg.webp 1024w, https://cdn.mos.cms.futurecdn.net/wbZbRmVNUGVPQj2eejTGEZ-1200-80.jpg.webp 1200w" type="image/webp">![click Start](https://cdn.mos.cms.futurecdn.net/wbZbRmVNUGVPQj2eejTGEZ-320-80.jpg)</source></picture>

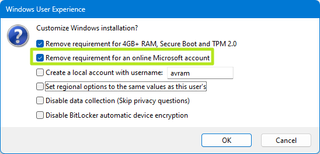
<figcaption class=" inline-layout"></figcaption></figure>A dialog box appears with a few options for bypassing Windows 11 install requirements.

7\. **Toggle "Remove requirement for an online Microsoft account" to on**  and **click OK.** You may also want to toggle on the other options, which include Removing the Secure Boot / TPM 2.0 and RAM requirements. You can also toggle on "Create a local account with username" and enter your username here and it won't need to prompt you during installation. You can also toggle on "Set regional options to the same values as this user's" and it won't prompt you for the country or keyboard.
<figure class="van-image-figure inline-layout" data-bordeaux-image-check="" id="bkmrk--14"><picture><source sizes="(min-width: 1000px) 970px, calc(100vw - 40px)" srcset="https://cdn.mos.cms.futurecdn.net/d4Tio8eiu5Ns2sCCKYhMHi-320-80.png.webp 320w, https://cdn.mos.cms.futurecdn.net/d4Tio8eiu5Ns2sCCKYhMHi-480-80.png.webp 480w, https://cdn.mos.cms.futurecdn.net/d4Tio8eiu5Ns2sCCKYhMHi-650-80.png.webp 650w, https://cdn.mos.cms.futurecdn.net/d4Tio8eiu5Ns2sCCKYhMHi-970-80.png.webp 970w, https://cdn.mos.cms.futurecdn.net/d4Tio8eiu5Ns2sCCKYhMHi-1024-80.png.webp 1024w, https://cdn.mos.cms.futurecdn.net/d4Tio8eiu5Ns2sCCKYhMHi-1200-80.png.webp 1200w" type="image/webp">![Click Remove requirement for an online Microsoft account](https://cdn.mos.cms.futurecdn.net/d4Tio8eiu5Ns2sCCKYhMHi-320-80.png)</source></picture>

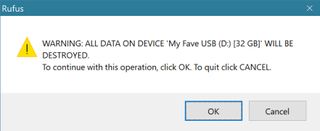
<figcaption class=" inline-layout"></figcaption></figure>8\. **Click OK** if warned that Rufus will destroy all data on the USB Flash drive. It is expected to overwrite all contents of the drive.
<figure class="van-image-figure inline-layout" data-bordeaux-image-check="" id="bkmrk--15"><picture><source sizes="(min-width: 1000px) 970px, calc(100vw - 40px)" srcset="https://cdn.mos.cms.futurecdn.net/fnnLMiBJZWKDtBGvEDLHgN-320-80.jpg.webp 320w, https://cdn.mos.cms.futurecdn.net/fnnLMiBJZWKDtBGvEDLHgN-480-80.jpg.webp 480w, https://cdn.mos.cms.futurecdn.net/fnnLMiBJZWKDtBGvEDLHgN-650-80.jpg.webp 650w, https://cdn.mos.cms.futurecdn.net/fnnLMiBJZWKDtBGvEDLHgN-970-80.jpg.webp 970w, https://cdn.mos.cms.futurecdn.net/fnnLMiBJZWKDtBGvEDLHgN-1024-80.jpg.webp 1024w, https://cdn.mos.cms.futurecdn.net/fnnLMiBJZWKDtBGvEDLHgN-1200-80.jpg.webp 1200w" type="image/webp">![Click OK](https://cdn.mos.cms.futurecdn.net/fnnLMiBJZWKDtBGvEDLHgN-320-80.jpg)</source></picture>

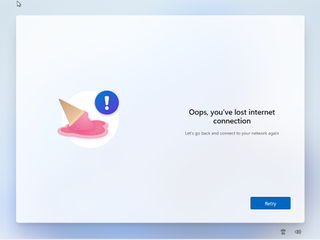
<figcaption class=" inline-layout"></figcaption></figure>Rufus will take a few minutes to copy files to the USB Flash drive. When it's done, you will have a bootable Flash drive. Be sure to click "skip" when you see the ice cream cone on the screen during install.